Accelerator Installation Guide - Advanced
The accelerator functionality in CIMAR is used to enable local file storage as a cache for faster study viewing in the Pro Viewer.
Required Role Permissions:
-
Gateways: Create, Edit

-
Destinations: Create, Edit, Delete


Instructions:
This guide covers 5 key points
- Initial Install
- Adding Multiple Orgs
- Using the Accelerator
- Routing Rules
- Automatic Start-up
Initial Install:
- On the computer that will contain the accelerator log in at https://cloud.cimar.co.uk/
-
From the dropdown list in the top-right corner, select the organisation that will utilize the accelerator.

- Go to the URL bar and type in https://cloud.cimar.co.uk/static/pa/viewer-accelerator-installer.exe (Or direct manually via Administration → More → Accelerators)
-
Click “Download Viewer Accelerator”

- The installer will download automatically. Once finished open the installer and follow the instructions using all default settings.
-
Once the install has finished you can open the app. If you need to search for it, the name of the app is “Viewer Accelerator” and has this logo:

- On first use, the Settings dialog should open automatically. If not, open the settings by right clicking the icon and selecting options → settings. Keep this settings window open for now as you’ll need to fill in credentials from the cloud.
-
Go back to https://cloud.cimar.co.uk/organization/accelerators as in step 3 and click “New Accelerator”

- Enter a name for the accelerator, select the “Local Accelerator” checkbox, and click Save.


- If you want studies shared within a namespace to be eligible for acceleration, ensure that “Push shared studies” is checked.
- If you only want storage copies to be accelerated, leave “Push shared studies” unchecked.

- Click “Attach” on the new accelerator row
- From the dropdown menu select the worklist studies will be accelerated from then click the Add button

- Copy/Paste the “ID” and “Serial Number” from the cloud accelerator and insert them into the accelerator settings you opened in step 7.
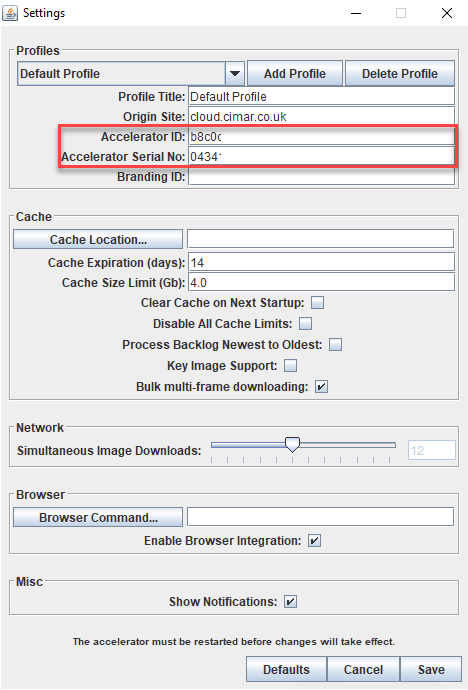
- Origin Site in the settings should be set to the URL you access the platform through, such as examplehospital.cimar.co.uk
- Optionally click “Cache Location” to choose where the studies will be saved.
- Tick the “Enable Browser Integration” checkbox and save the settings.
- Back in the “Attach” dialog select the relevant namespaces you wish to connect to the accelerator and finish by clicking “Add”
-
The Accelerator is now installed and will work after restarting the service. This is done by right clicking the app icon and choosing “Quit”


Adding Multiple Orgs:
To add another organisation to an already existing Accelerator, follow a similar pattern as for the install as described above.
- On the computer which has the accelerator installed, log in at https://cloud.cimar.co.uk/.
-
From the dropdown list in the top-right corner, select the organisation that you want to add to the accelerator.
- Go to the URL bar and type in https://cloud.cimar.co.uk/organization/accelerators. (Or direct manually via Administration → More → Accelerators)
-
Click “New Accelerator”.
- Enter a name for the accelerator, tick the “Local Accelerator” and if you want studies that have been shared into the worklist to be accelerated as well, then tick the "Push Shared Studies" checkbox, then save the accelerator. (All other fields can be left blank)
Do not tick Push shared Studies if you only want storage copies to be accelerated.
- Click “Attach” on the new accelerator row on the platform
- From the dropdown menu select the worklist studies will be accelerated from then click the "Add" button.
-
Open the accelerator's settings on the computer where the original install was made. (This can be reached by right-clicking the icon and directing to settings. )

- Click “Show Admin Setting” at the top and then “Add Profile”.
- Now you do the same as you did with the initial install:
-
Copy/Paste the “ID” and “Serial Number” from the cloud accelerator “Attach” dialog and insert them into the accelerator settings you have just opened.

- Origin Site in the settings should be set to the URL you access the platform through, for example: examplehospital.cimar.co.uk
- Optionally click “Cache Location” to choose where the studies will be saved.
- Tick the “Enable Browser Integration” checkbox and save the settings.
- Back in the “Attach” dialog select the relevant namespaces you wish to connect to the accelerator and finish by clicking “Add”
- The Accelerator is now installed and will work after restarting the service. This is done by right clicking the app icon and choosing “Quit”

Using the Accelerator:
- To test the accelerator, select a study from the worklist of the namespace that was chosen for the accelerator.
- In the Actions dropdown, select “Send” and then select the accelerator.
- A notification will pop up saying that the accelerator is “fetching” the study. Another notification will pop up when the study has been “fetched”.
- A lightning bolt will appear under the study checkbox when the study has been sent to the accelerator.
-
Click the “Images” icon to view the study. A new window or tab should open with the study in the viewer if the accelerator installation was successful.


For more detail on using the installed accelerator, please see https://support.cimar.co.uk/article/266-accelerator-guide